| View previous topic :: View next topic |
| Author |
Message |
Chet Bishop
Super Member

Joined: 23 Mar 2007
Posts: 678
Location: Forest Grove, Oregon
|
 Posted: Sat Mar 30, 2013 1:47 am Post subject: 2013 Marylhurst University Musical Instrument Maker's Show Posted: Sat Mar 30, 2013 1:47 am Post subject: 2013 Marylhurst University Musical Instrument Maker's Show |
 |
|
For those of you in the Northwest (Well--maybe just if you are in the general Portland area...), this is a pretty good show.
http://www.nwmusicalinstrumentshow.org/
There should be about a dozen violin-family makers there, I think, a few mandolin makers, one banjo maker, one harp-maker, etc. But by far most will be guitars of every sort. There will be concerts in a separate building. Admission is $3, I think.
My son and I will be among the exhibitors this year. Our table will be the first on the left as you enter the hall. Drop by if you are in the area.
I am frantically trying to complete another cello in time for the show.  Just finished trimming the bassbar this afternoon, and am hoping to graduate the back (one-piece back) tonorrow. Gotta do taxes, though, too. Just finished trimming the bassbar this afternoon, and am hoping to graduate the back (one-piece back) tonorrow. Gotta do taxes, though, too.
_________________
Chet Bishop
https://bluefiddles.com
https://fivestringfiddles.com |
|
| Back to top |
|
 |
Chet Bishop
Super Member
Joined: 23 Mar 2007
Posts: 678
Location: Forest Grove, Oregon
|
|
| Back to top |
|
|
Mat Roop
Senior Member
Joined: 24 Mar 2007
Posts: 911
Location: Wyoming Ontario
|
| Posted: Sat Apr 06, 2013 11:53 pm Post subject: |
|
|
mighty nice cello Chet! ... i'm envious!
Cheers, Mat |
|
| Back to top |
|
|
Chet Bishop
Super Member
Joined: 23 Mar 2007
Posts: 678
Location: Forest Grove, Oregon
|
|
| Back to top |
|
|
Mat Roop
Senior Member
Joined: 24 Mar 2007
Posts: 911
Location: Wyoming Ontario
|
| Posted: Sun Apr 07, 2013 4:54 pm Post subject: |
|
|
| I didn't but did now.... that is an awesome piece of wood! keep the pics coming Chet... Always appreciate seeing nice work... Cheers, Mat |
|
| Back to top |
|
|
Chet Bishop
Super Member
Joined: 23 Mar 2007
Posts: 678
Location: Forest Grove, Oregon
|
|
| Back to top |
|
|
actonern
Super Member
Joined: 15 Aug 2007
Posts: 444
|
| Posted: Thu Apr 11, 2013 6:09 am Post subject: |
|
|
Interesting Chet:
Thanks for the photo "essay."
I've never installed necks that way... am I right that the main advantage in doing it this way is that you don't have to be as dead fussy about how far up the mortise the neck wants to end up when the glue is applied?
Best regards,
Ernie |
|
| Back to top |
|
|
Chet Bishop
Super Member
Joined: 23 Mar 2007
Posts: 678
Location: Forest Grove, Oregon
|
| Posted: Thu Apr 11, 2013 9:37 am Post subject: |
|
|
I hadn't thought about it that way-- to me, it meant that I had some flexibility as to depth, yes, but that the join at the heel will be perfect, as I will simply plane the heel off flush with the back of the garland, and the back plate will be glued and clamped to it, rather than trying to get the heel to perfectly fit the (already installed) back plate.
I deliberately left the heel long before fitting the neck, and made marks to show when I had reached my optimum depth, etc. I knew in advance that the heel would overshoot the neck block by about 5mm.
I have done it both ways. Both ways work. Working on other people's fiddles, obviously, I am not given a choice-- I have to do it the other way.
_________________
Chet Bishop
https://bluefiddles.com
https://fivestringfiddles.com
Last edited by Chet Bishop on Sat Apr 13, 2013 10:00 am; edited 1 time in total |
|
| Back to top |
|
|
Michael Darnton
Moderator
Joined: 23 Mar 2007
Posts: 1347
Location: Chicago
|
| Posted: Thu Apr 11, 2013 12:11 pm Post subject: |
|
|
I've used that method on a couple of baroque violins, but before the top was on, because it permits me to hide a very normal and secure neck joint under what looks like a traditional exterior.
I made some jigs when I was at WH Lee to do that, on the bare ribs, with a router, but what we did was rout it so that the neck was still a bit proud of its final position, and the mortise sides cut vertically. That way the neck could be set on the finished body, but the job was almost finished, and if there was any (relatively tiny) last minute correction needed it there was just enough room to correct it. If everything was perfect, and it usually was, all that was needed was to quickly undercut the mortise, and the neck would slide into it's finished location. I made a machine to cut the heel, too, so it was all under control
_________________
new blog at my site! http://darntonviolins.com/blog
my work sites: http://darntonviolins.com and http://darntonhersh.com |
|
| Back to top |
|
|
Chet Bishop
Super Member
Joined: 23 Mar 2007
Posts: 678
Location: Forest Grove, Oregon
|
| Posted: Thu Apr 11, 2013 12:41 pm Post subject: |
|
|
Hard to visualize, but I read it several times, and I think I understand.
I just did it this way because it was easier and faster. And I have only done it on cellos, so far, with maybe one exception (can't recall). David Rubio did it this way, which where I first saw it.
_________________
Chet Bishop
https://bluefiddles.com
https://fivestringfiddles.com |
|
| Back to top |
|
|
Michael Darnton
Moderator
Joined: 23 Mar 2007
Posts: 1347
Location: Chicago
|
| Posted: Thu Apr 11, 2013 1:11 pm Post subject: |
|
|
We had two locating pinholes on the centerline of the form, near the ends. All the shop jigs ran off these. So I made a vertical plate with two pins, mounted to the front of a bench. The cello ribs slid onto this, upright. Above was mounted a table with a tapered slot for the router to trace into the ribs. This way the neck rebate was always the same, and centered (via the pins).
The rig for shaping the bottom and sides of heels is more complex, harder to verbally explain without illustrations.
I made the same rig, upside down, permanently mounted under a small drill press. Cut off a spade bit shaft very short for stability, then tapered the spade bit to the right taper for endpins, perfectly centered, and used this to drill the endpin hole in the ribs, with the proper taper, absolutely straight and centered.
_________________
new blog at my site! http://darntonviolins.com/blog
my work sites: http://darntonviolins.com and http://darntonhersh.com |
|
| Back to top |
|
|
Chet Bishop
Super Member
Joined: 23 Mar 2007
Posts: 678
Location: Forest Grove, Oregon
|
| Posted: Thu Apr 11, 2013 1:20 pm Post subject: |
|
|
Wonderful stuff! Thanks for sharing it.
I don't know if I will ever get prolific enough to warrant such things, or, more specifically, whether I will learn to market well enough, but I can certainly see the advantage to doing things that way.
Thanks again. I will keep these things in mind.
_________________
Chet Bishop
https://bluefiddles.com
https://fivestringfiddles.com |
|
| Back to top |
|
|
actonern
Super Member
Joined: 15 Aug 2007
Posts: 444
|
| Posted: Thu Apr 11, 2013 1:29 pm Post subject: |
|
|
Another question Chet:
Once the heel is planed flush with the endblock and you go to glue on the back, is it tricky to make sure the neck projection stays withing tolerance as you glue the back on, with what is usually a tiny variation from the original plate-to-rib tracing? |
|
| Back to top |
|
|
Chet Bishop
Super Member
Joined: 23 Mar 2007
Posts: 678
Location: Forest Grove, Oregon
|
| Posted: Thu Apr 11, 2013 1:49 pm Post subject: |
|
|
Once I know the height of the bridge projection, I check the elevation of the fingerboard above the front plate and just check that as I am fitting the back to the garland. You are right, though...it doesn't take much to throw things way off.
In a few cases, I have discovered, after the instrument (a violin or viola) was completed, that somehow the neck height had changed. I did a neck pull-back to fix it, and I was astonished at how tiny a change at the neck caused such a big change at the bridge.
This is only my second cello, so don't hope for any authoritative answers from me. I'm flying without instruments, using the Strad Poster, Strobel's books, and the ol' seat-o'-the-pants dead-reckoning to navigate. So far it is working out OK, but I already have found things I would do differently on #3. It has been a good learning experience, which is why I have tried to post each step on my website, for others to benefit from my mistakes, etc.
_________________
Chet Bishop
https://bluefiddles.com
https://fivestringfiddles.com |
|
| Back to top |
|
|
Chet Bishop
Super Member
Joined: 23 Mar 2007
Posts: 678
Location: Forest Grove, Oregon
|
| Posted: Sat Apr 13, 2013 1:47 am Post subject: Cello on the home-stretch! |
|
|
It is beginning to look as though I may actually get this cello done in time for the show. Here is what it looked like as of an hour ago:
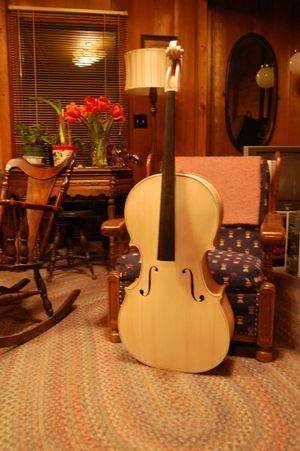
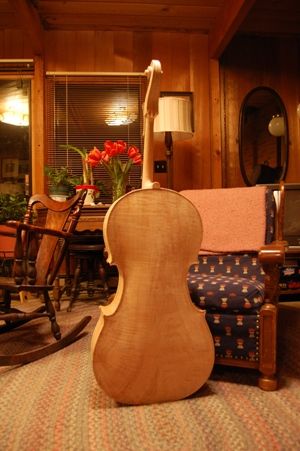
I still have a long way to go, but I made good progress today.
The whole step-by-step is on the website, if you are interested.
_________________
Chet Bishop
https://bluefiddles.com
https://fivestringfiddles.com |
|
| Back to top |
|
|
|
|
You cannot post new topics in this forum
You cannot reply to topics in this forum
You cannot edit your posts in this forum
You cannot delete your posts in this forum
You cannot vote in polls in this forum
|
Powered by phpBB © 2001, 2005 phpBB Group
|

 FAQ
FAQ Search
 Memberlist
 Usergroups
 Register
 Profile
 Log in to check your private messages
 Log in


